Simple Sourdough Scone

This has to be the most simple scone recipe I have ever tried, and the outcome was delicious fluffy scones! 

You need a sourdough starter, so if you don’t have one, you will need to make one. I quickly talk through how to make that in this video: https://youtu.be/ylBLkbbipI8?si=2olypY-va7Xq9vD0 . I have switched from the flour mentioned in this video to dark rye flour for the starter. 

What you add to any of my recipes helps increase the fibre points. 

Basic Recipe

350g flour – self-raising. If you don’t have self-raising flour, use plain flour and add 4 tsp of baking powder to help. 

85g sourdough starter

275g milk (weigh the milk, it’s not 275ml!). You can use any milk or milk alternative

1 tspn bicarbonate of soda

1/2 tspn salt

You can add chopped nuts, seeds, dried fruit of your choice to boost your fiber points. The basic recipe will give you 2 points (because it’s sourdough). 

Instructions

Mix together all the ingredients gently. You don’t need to work the mix like you do with bread. 

Dust the baking tray with non-glutenous flour – cornflour or rice flour.

Drop your mix onto the tray and dust the top of the mix with the above flour so you can flatten it down. I flattened mine down to about 2cm thick. Using a sharp knife, cut into squares (how many depends on how big or small you want your scones). 

In a preheated oven 220c, bake for 18 mins. 

Allow to cool, then enjoy!!  I like butter on my scones. Because these are not sweet (unless you add dried fruit) you can add savoury toppings like cream cheese and smoked salmon, or the low sugar homemade jam

Salmon & spinach curry with aromatic rice and sourdough flatbread

This one isn’t my usual chop-and-drop recipe… But it’s still easy and I can assure you it’s worth it! 

In advance, you need to prepare your sourdough starter to make the flatbreads. I used to just buy chapati wraps from the shops (convenience is great) until I looked at the ingredients list. A chapati or flatbread should be flour, water, salt… all of them (because they have a long shelf life) had a whole bunch of crap in them I just couldn’t. 

The good news with sourdough flatbread, if you have a starter on the go, they are really easy to make. If you don’t have one on the go, check out my sourdough bread blog for instructions. 

Sourdough flatbread – Fiber points 3+ – this makes 4 flatbreads

100g starter

150g flour (if you use a wholegrain or multigrain flour, this will give you more fiber points)

50g water

1/2 tsp salt

1 tsp cumin seeds (or you could use fenugreek seeds, ajwan seeds, fennel seeds OR coconut)

Mix it all together – it is quite a dry mix, so you might want to get your hands in there to ensure you hydrate all the flour. Prove in a warm space for a minimum of 4 hours. I have left mine for more than 24 hours in the past. The longer it proves, the more sour the dough. Then dust your counter with some corn or rice flour, chop your mix into 4 and roll out each serving to maybe half a centimetre (or thinner) then dry fry on a hot frying pan or skillet. 

Aromatic Rice = Fiber points 4+

1/2 cup of rice per person

1 stick of cinnamon 

1 tbsp coriander seeds 

2 cardamon pods (squash them so they break open)

Fennel seeds or star aniseed

Raisins or sultanas

With the spices, you may want to add a bit more depending on how many people you are making rice for. And also, add or remove any that you have a preference to. Your dish to flavour as you wish. I sometimes make my rice with a can of coconut milk instead of water. 

I use a rice cooker, so my ratio is 1 cup rice – 2 cups water, then I set it to cook the rice. If you make it any other way, adapt to your cooking instructions. I know some people cook rice in a pressure cooker – I only have a manual rice cooker, but if you know how to make rice that way… can you please share how to do that with me???

Salmon & Spinach Curry fiber points 14+

I tweaked the original recipe from the recipe book I got this (Made In India

2 tablespoons of olive oil

1 cinnamon stick

6 whole peppercorns

2 cloves

1 large onion finely chopped

1/2 tsp brown sugar

thumb fresh ginger grated (I buy frozen ginger from Farmfoods, which is very useful!)

4 cloves of garlic crushed

1 chilli chopped (optional)

When it comes to the rest of the spices, I add more than the recipe in the book suggests, so my adaptations are what I am sharing here

1/2 tsp garam masala

2 tsp ground cumin

2 tsp ground coriander

1/2 tsp turmeric

1 tsp cayenne pepper

1 1/4 tsp salt

1 bag of spinach (we had LOADS frozen from the allotment and potioned up)

2 salmon fillets

In the original recipe, they also included 250g of chopped fresh tomatoes. I am seasonal with tomatoes; as this is the winter and not our season for them, I chose to leave them out. I will let you know where they added them in the cooking instructions.

Cooking Instructions

Heat the oil in a large frying pan (ideally, one you have a lid big enough for). When the oil is warm, add the cinnamon, clove and peppercorns to heat for a couple of mins to bring out their flavour. 

Add the onion and sugar and heat through until the onions start to caramelise (at this point, they added the tomatoes and were allowed to cook until the tomatoes softened). 

Add the ginger, garlic and all the spices and mix well, keep stirring (the book said 8 minutes, I did about 2 – so do what you have the patience for!). Then add the spinach and mix through, then cover until it’s wilted.

Take the skin off the salmon and chop it into chunks then mix it through, making sure the salmon is fully coated. Cover and allow to cook. Depending on the size of your chunks 4-8 mins. Just make sure the fish is cooked through. 

Remove the cinnamon sticks from the curry and rice. I would also remove the cardamon pods and star aniseed from the rice, but that’s up to you and you are ready to serve with your rice and flatbread! 

Why is sourdough bread good for you?

Hello, I hope you have had a lovely week… 

If you have been following me for a while on social media you might know that I love making sourdough… 

It’s become mighty trendy over the last few years (although not as trendy as the banana loaf was over lockdown!). 

So what is the deal with sourdough? 

1. It tastes AMAZING! Once you have had it, supermarket loaves will never be the same again. 

2. The fermenting process makes it easier to digest and more nutrients available. 

3. The fermenting process also gives it probiotic properties which can help improve your gut microbes

4. Homemade is always better and there are no additives/preservatives/added sugars 

5. Typically it has a lower glycemic index meaning it doesn’t spike your blood sugars like other breads which will help you avoid the afternoon carb crash… 

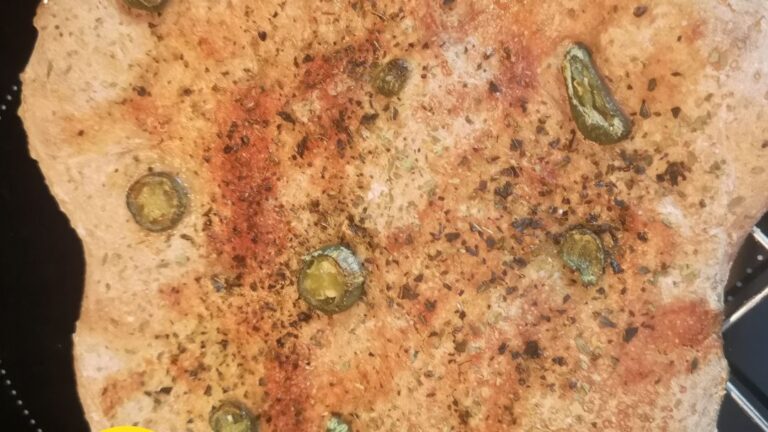
6. You can add all sorts of nuts, seeds, dried fruits to change the flavour and fiber profile.  

Sourdough Before you can start making a sourdough loaf, you need a starter. You can get this from someone (like me) that already makes sourdough.

Or you can make your own.

Sourdough Starter In a jar add 25g flour and 25g of water (grams of water, not ml) I use stoneground rye flour as I found this to thrive in my environment.

Leave overnight somewhere warm, covered with a muslin cloth or tea towel, then add another 25g of flour and 25g of water

Leave overnight, always covered, dispose of 50g of the starter and add another 25g of flour and 25g of water

Leave overnight and repeat dispose of 50g of the starter and add another 25g of flour and 25g of water dispose of 50g of the starter and add another 25g of flour and 25g of water

Repeat this process for around 7 days.

Over the days you should start to see your mix coming alive and getting bubbly.

We dispose of some of the mix so we don’t end up with loads and to help the mix come alive.

Anytime you are making a loaf, you will ‘feed’ your starter (equal measures of flour and water).

Either leave the starter overnight to use in the morning or sit somewhere warm to get the bacteria working.

Then take out 150g of the starter mix – always make sure you leave some starter for the next time so you don’t need to keep making a fresh starter.

I usually feed my starter with 75g flour, 75g water (because I am taking out 150g for my loaf).

Making a loaf – it’s timely, but 100% worth it

Once you have a live starter, then you can make your loaf. I make mine:

500g organic flour

300g water (weighed liquid)

150g starter

10g salt

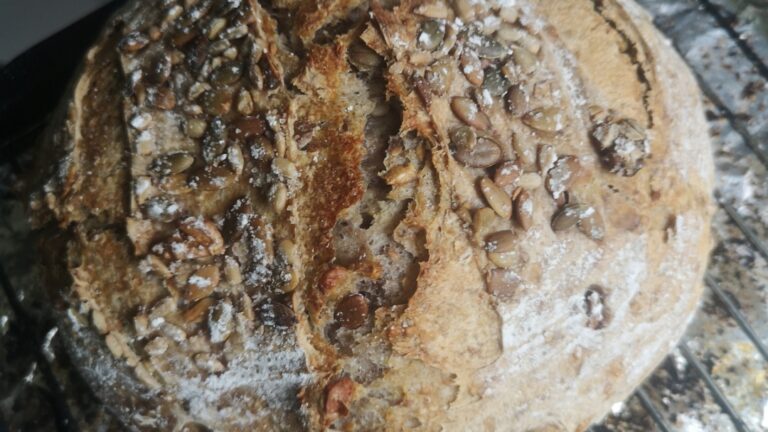
a cup of mixed seeds/nuts

Mix everything through, and leave to stand for around an hour in a bowl covered with plastic wrap (cling film) using a plastic spatula stretch & fold the mix about 35 times, leave to sit for 10mins then repeat another 3 times until your dough starts to become a firm ball (and doesn’t break up when you stretch and fold) Sometimes you need to do this more, other times less. The more you bake the bread, the more you will get a sense of what feels right. It never works out the exact same. 

Once you are happy with your ball of dough, dust a proving basket or another bowl with corn or rice flour (starchy but no gluten so the dough doesn’t stick). You will then leave to prove. Your ball of dough should roughly double in size. How long this takes will depend on your room temperature – the longer the prove, the more sour your loaf. I have had loaves prove in 8 hours (in the winter when I had heating on and left the bread to prove at the heater) and I have also left it to prove over 36 hours… This was in a much cooler environment. You will know when it’s ready by gently pressing and there should be a spring back… If it collapses, it has over proved- which is fine, you will just get less bubbly bread. Same if it’s under-proved. 

Once you are happy with the prove, we are going to transfer to either a Dutch oven (cast iron casserole dish) or a roasting tin with a lid. I would recommend you line your dish with grease-proof paper and dust it with corn or rice flour. Taking a sharp knife or blade score the top of the loaf. I like to shake some salt on to the crust too for extra flavour. 

We then go to bake. The good news is you don’t need to preheat the oven. Make sure the lid is on your dish, pop in the oven at the highest temp for 30mins, then turn the oven down to 220deg C and bake for another 25mins. DO NOT open the lid until after the 55mins! 

At the 55mins mark, check the loaf, if it’s looking a bit pale, pop it back in for another 5 or so mins to brown without the lid on. 

Then, you need to be patient… Once you take the loaf out the oven, transfer to a cooling rack and leave for around 3 hours… Your loaf continues baking in this time… THEN you are ready to slice and eat… 

It is a lengthy process. It is 100% worth the wait. Once you have done 1 loaf and tasted it, you will do another and then work out the timing so you always have fresh bread available!

Let me know how you get on! 

Spring is sneaking in and Tomato Toast is on the menu

Tomato Toast Fiber Points 9+

I love this recipe; it’s so simple, and you can add various herbs and seeds to boost the diversity of something so simple. 

Sourdough bread (to get the fiber points) or a nice bloomer. You want bread that has a good surface area when you slice it. If you are buying bread with a shelf life of more than 48 hours, you don’t get points for that – there are too many unhelpful ingredients that counteract any benefits (i.e. if it’s got an ingredients list that is not flour, water, salt). 

Tomatoes sliced (approx 1/2 cm thick)

Leaf – spinach, rocket, and fresh basil leaves are my favourite

Shallots finely sliced

Garlic oil (I crush some garlic cloves into olive oil and keep them ready to use in the fridge)

Dried herbs of your choice

Seeds of your choice – sesame and pine nuts go really well with this

Cayenne pepper or chillies if you like a bit of heat

Black pepper & sea salt

Instructions

Under the grill, toast one side of your bread. Then, on the untoasted side, spread your garlic oil (butter would be fine too), add a layer of your leaves, then the onion and sliced tomatoes, season with herbs, spices, salt and pepper, and put under the grill for a few mins until the tomato starts to soften. Then add the seeds (if you add them too soon, they will burn before your tomato is cooked) and pop back under the grill for a minute or 2. Watch those sesame seeds; they go from just toasting to burning in the blink of an eye!

If you are feeling fancy, you could add a drizzle of balsamic vinegar!


Saturday Kitchen – It’s still soup season!!

February is technically still winter, even though new life is peaking through in the allotment/garden/park! 

Soup season is still with us. Now, I know I have shared this recipe with you before… BUT it’s delicious, and I know many of you tried it out (because you messaged me to tell me)… And some people here now missed this the last time I shared it… 

Tomato & Lentil Soup                   Fibre Points 10+

225g red lentils

1 tin tomatoes

1 carrot

1 onion

8 cups cold water

1-2 tbsp tomato puree

3 tsp veg bullion or 2 veg stock cubes

4 cloves garlic

2 sticks celery

1 tbsp: basil & oregano

3 bay leaves (leave whole to remove at end)

Instructions

Chop everything that needs to be chopped, put it all in a slow cooker, put it on high and leave for 3 hrs or low and leave for 5-6 hrs. 

If making in a pot on the stove, chop and put everything in the pot. Bring to boil, then simmer for 1hr. 

Remove bay leaves, blend until smooth and serve with some delicious sourdough.

Mindset Matters

If you are living with an illness, injury or health condition that has you feeling stuck and want a way out… Join my 3 day mindset challenge and let’s get you out the funk. 

The ultimate comfort food

What is your ultimate comfort food? My absolute comfort food is macaroni cheese, chips AND garlic bread! BUT… fiber points = pretty much zero, unless I went to the bother of making the vegan version, but that just doesn’t cut it. 

For my new subscribers, just to update you on what the fiber points thing is about. A healthy gut is a gut with a broad diversity of gut microbes and the only way to get good diversity is to eat a wide range of fiber sources to feed those bugs. The science says aiming for 30+ sources a week (fiber points), that includes fruit, veg, herbs, spices, nuts, seeds and whole grains, and it’s sources, not portions. The recipes I share here and on my blog are easy ways to get fiber points. That’s why my mac cheese doesn’t cut it. 

I do have a few other comfort foods: kitchari dahl, any kind of veggie curry, lentil soup and homemade pizza! And something that shocks a lot of people, NO CHEESE on my pizza… don’t knock it until you have tried it.

This weeks recipe: 

Tortilla Pizza Fiber Points 5+

The 5 points are just for the tomato sauce!! 

Tomato sauce:

Tin tomato (check no added salt or sugar)

Chillies (optional)

Basil (fresh or dried)

Oregano (fresh or dried)

1 clove garlic crushed

Blitz together in a food processor or blender

Pizza base options:

Sourdough flat bread (need to prepare the day before if you have a sourdough starter on the go)

Sourdough pizza base (I quite like the one from Morrison’s)

Homemade pizza base (flour water & salt)

2 tortilla wraps – sandwich some of the tomato sauce between wraps

Dry fry both sides of the wrap sandwich till slightly crispy

Topping:

Here you get to make your dream pizza. Topping ideas:

Rest of the tomato sauce

Spinach & rocket (or just spinach)

Cherry tomatoes (chopped)

Bell peppers (any colour) (chopped)

Small onion (thinly sliced) red onion can be a nice alternative

Button mushrooms (sliced)

Roast aubergine

Roast sweet potatoes (cut them into small pieces and roast them before you add them as a topping)

Dried basil & oregano

Dried chilli flakes

Pine nuts

Pineapple (I know this one causes arguments)

Chicken breast pieces

Cheese (if you like – I prefer no cheese personally)

The world is your oyster making your own pizza toppings and the more variety, the more fiber points

Heat oven to 180c. 

Spread tomato sauce over tyour base, and add your choice of topping. Place in the oven for 10-15 mins if you are using the tortilla wraps or shop bought base, 15-20 mins if you are making your own base.

What would you put on yours? 

Spicy Tomato & Lentil Soup

 Hello,

Cosy in with a warming soup… 

Not only can soup be packed with fiber and nutrients, but because you blend it, it can be much easier to digest.

If, like me, you can be sensitive to tomatoes, I find when they are cooked, I am less sensitive, but also removing the skins – so either buy peeled tomatoes or if you get plum tomatoes in a can, they are easier to get the skin off. 

Tomato & Lentil Soup                                       Fibre Points 10+

225g red lentils

1 tin tomatoes

1 carrot

1 onion

8 cups cold water

1-2 tbsp tomato puree

3 tsp veg bullion or 2 veg stock cubes

4 cloves garlic

2 sticks celery

1 tbsp: basil & oregano

3 bay leaves (leave whole to remove at end)

1/2 tspn black pepper

Cayenne Pepper – depending on how hot you like it.

Chop everything that needs to be chopped, put it all in a slow cooker, put it on high and leave for 3 hrs or low and leave for 5-6 hrs. 

If making in a pot on the stove, chop, and put everything in the pot. Bring to boil, then simmer for 1hr. 

Remove bay leaves, blend until smooth and serve with some delicious sourdough.

Potato and leek soup

Nourishing your body is essential for better health. Gut microbiome research is coming on leaps and bounds over the last few years.

The best ways to improve gut health is eating fermented foods (like the recipes I have shared in previous weeks) and increasing fiber diversity, aiming for at least 30 different sources each week. This is the kind of information I teach within The Healing Rebel Mastery programme which you can sign up for here>>> https://iamjenwilson.thrivecart.com/thehealingrebel/

30 sources sound a lot, but it’s not. Herbs, spices, nuts, seeds, grains, as well as fruit and vegetables all count. If you try and keep your veggies local and seasonal that will help the diversity and your health throughout the year. 

Salads are for spring/summer, root veggies are for autumn/winter. 

This week I am bring you a classic soup and showing you how you can easily boost the diversity and fiber points.

Potato & Leek Soup                                         Fibre Points 10+

2 medium/large leeks.

3 or 4 medium potatoes (if you use different varieties of potato that will increase your fiber points.

2 cloves of garlic (fermented garlic is even better)

Dried herbs: oregano, basil, coriander leaf, sage

2 bay leaves (remove these at the end the cooking process)

2 tablespoons extra virgin olive oil

3 heaped tspn bouillon or 3 stock cubes

Heat the oil, chop everything that needs to be chopped, put all the ingredients in the pot and sweat out the veggies to bring out the flavour. 

Once the veggies soften, add about 1.5 litres of boiling water. 

Bring to a boil then reduce to a simmer and leave to cook for around 45mins.

Remove the bay leaves then blend till smooth. 

When serving, adding some hemp seeds and black pepper gives you an additional couple of points. 

Having it with sourdough bread gives you even more fiber points! 

Let me know if you give it a go and if there are any tweaks you make. 

Low Sugar Blackberry Jam

Happy Saturday

I love jam, but so many shop-bought jams have SO MUCH SUGAR and often a whole load of other ingredients that personally… I don’t think jam needs… 

As I like to keep it simple, less ingredients the better.  

And, what’s even better, blackberries are abundant at the moment, which you can forage FOR FREE!! 

Blackberry Jam                                              Fibre Points 2

Use a ratio of 5:1 (berries to sugar) eg 500g berries, 100g sugar

Juice of a lemon (or lime)

You can either do this stovetop or in the slow cooker. 

On the stovetop: Mix everything in your pot over medium heat. The juice will release and once the sugar has dissolved, allow it to come to a boil, then reduce it to a simmer for 30 mins. Switch off the heat and leave to cool before transferring into sterilised jars for storage in the fridge.   

In Slow cooker: Mix everything in the pot, put of high for 3-4 hours string occasionally. Switch it off, leave to cool before transferring into sterilised jars. 

It tastes great on sourdough bread! 

Let me know if you make it and what you think.

Low Sugar Blackberry Jam

Happy Saturday

I love jam, but so many shop-bought jams have SO MUCH SUGAR and often a whole load of other ingredients that personally… I don’t think jam needs…

As I like to keep it simple, less ingredients the better.

And, what’s even better, blackberries are abundant at the moment, which you can forage FOR FREE!!

Blackberry Jam                                              Fibre Points 2

Use a ratio of 5:1 (berries to sugar) eg 500g berries, 100g sugar

Juice of a lemon (or lime)

You can either do this stovetop or in the slow cooker.

On the stovetop: Mix everything in your pot over medium heat. The juice will release and once the sugar has dissolved, allow it to come to a boil, then reduce it to a simmer for 30 mins. Switch off the heat and leave to cool before transferring into sterilised jars for storage in the fridge.

In Slow cooker: Mix everything in the pot, put of high for 3-4 hours string occasionally. Switch it off, leave to cool before transferring into sterilised jars.

It tastes great on sourdough bread!

Let me know if you make it and what you think.

Back To Top